
Yellocello Internet Services
Detailed Mail Settings
Instructions
The instructions below show how Microsoft Outlook can be set to handle your
emails on the Yellocello server. The example is based on an email address called
harry@owlpost.co.uk.
In Microsoft Outlook, go to the Tools menu and click Account Settings.
Then click the "New" button and choose the POP3 option and click Next.
Then tick the "Manually configure server settings or additional server types"
and click Next.
Then choose the "Internet E-mail" option and click Next.
Other email programs may have slightly different steps, but the fields that
you need to complete will have very similar names to the ones described below. For settings in Apple Mail, please follow the instructions below, but see the images at Apple Mail Settings.
You will then see a dialog box, which we have filled in as follows:
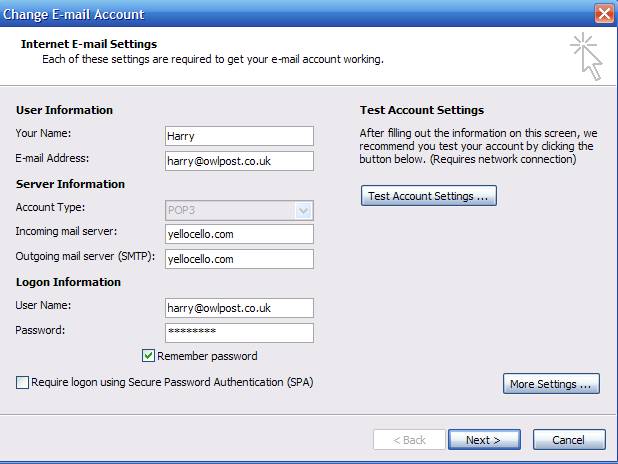
In the Your Name box (where we have put "Harry") enter your name exactly as
you want your email recipients to see it.
In the E-mail Address box (where we have put "harry@owlpost.co.uk") enter your
email address - this address will appear on all of your outgoing emails, so
people know where to reply to you.
In the Incoming (POP) and Outgoing (SMTP) server boxes, enter "yellocello.com".
In the Logon section, you must enter your username and password. For Yellocello's
system, the username is always the same as your email address. Your mailbox
password was set when the mailbox was set up. If you have not been told it,
you will need to ask the person who created your mailbox.
Then click on the More Settings button, which will open another dialog box,
and choose the "Outgoing Server" tab, which we have completed as follows:
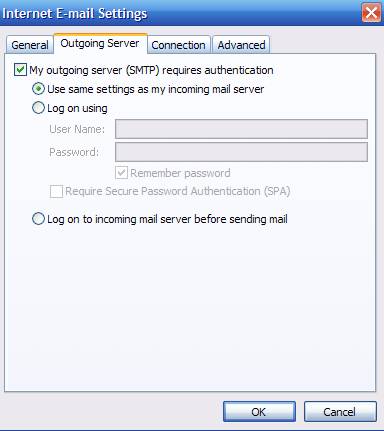
You should normally tick "My outgoing server (SMTP) requires authentication"
and choose "Use same settings as my incoming server".
Your server has a fixed limit on the space allowed and allowing mail to accumulate
on the server without being deleted may cause you to reach that limit. To avoid
these problems, we advise you to delete all mail from the server once it has
been downloaded to your computer. If you need to keep all mail on the server,
we can offer you an IMAP mail account for an additional cost or, for sophisticated
corporate mail handling at a low price, we'd recommend linking your domain to
Microsoft's Office
365 solution. Please ask us if you'd like to use either of these services.
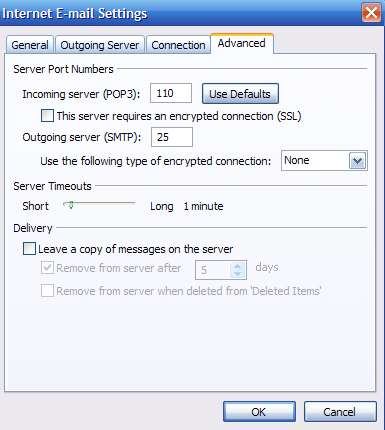
To ensure that old emails are deleted from the server once you've received them,
choose the "Advanced" tab and and ensure that there is no tick in the "Leave
a copy of messages on the server" option, as below:
Then click OK to save those settings and then Next and Finish and finally Close.
That's it! You are now ready to send and receive emails with your new address.
Further Information
Incoming Mail
When someone sends you an email, it is received in your mailbox on the Yellocello
server, waiting for you to pick it up using either an email program (such as
Outlook or Apple Mail) or via Webmail (where you can view your emails from any
web browser). If you are not able to collect your mail for some time, the mail
will remain on the server and will not be deleted until you log in and download
it. Once you have downloaded mail to your computer, the mail will normally be
deleted from the server, either immediately or within a few days, depending
upon your settings - see above.
Outgoing Mail
Sending emails is a separate process from receiving them, even though most email
programs allow you to send and receive consecutively with the click of one button.
In the background, the program first sends any outgoing email and then it collects
any mail waiting in your mailbox on the server. The significance of this is
that you can set up your computer to collect mail from one mail account, whilst
sending mail through another if you wish (see "Multiple Email Addresses"
below).
In your email program there will be a setting called Outgoing Mail Server or
SMTP Server or similar. This is the computer (a server is just another name
for a computer) on the internet that you contact to send your mail through (a
bit like an internet post office). When your mail program wants to send mail,
it contacts that computer and says "hi - I am Harry's computer and I'd like
you to deliver some mail for me". That computer wants to verify that you really
are Harry (to stop strangers from using that 'post office' server to send spam),
so it asks you to verify yourself using one of two common methods:
1) if the 'post office/SMTP' server is owned by the ISP that you use to connect
to the internet (eg Zen or BT or Virgin), then it knows who you are and it will
therefore allow you to send emails, as it has already verified you by being
physically connected to that ISP through your broadband connection.
2) The second common method is to use a username and password to verify yourself
to the 'post office/SMTP' server. If you have an account with them that provides
you with a mailbox, then it will also allow you to send mail if you verify yourself
with the same username and password that you use for incoming mail.
In practice, this means that, if you have a mailbox with Yellocello, then you
are also able to send mail via Yellocello's servers, so long as you verify yourself
under option (2). You can choose either option (1) or (2) when you're at home
but, if you have a laptop, option (2) gives you more flexibility, as you will
then be able to send mail via Yellocello whether you're at home or anywhere
else, as the verification isn't dependent upon your current connection to the
internet, but verifies you with a username and password from anywhere.
Webmail
If you're away from your computer, you can collect and send mail using Webmail
on any internet browser by going to webmail.yellocello.com
(or clicking the link from www.yellocello.com)
and entering the username and password for your mailbox.
Multiple Email Addresses & Aliases
If you have more than one email address where emails sent to you via multiple
addresses are all received together in one mailbox, you can set up multiple
accounts in your mail program. Just follow the steps under the "Instructions"
heading above for each account that you wish to create. If you only have one
mailbox, then the settings you enter in the "Server Information" and "Logon
Information" fields will be the same for all accounts. However, you can enter
your other email address in the "E-mail Address" field under "User Information"
and any name you wish in the "Your Name" field. These two fields have no impact
on how you collect your email from the mailbox. Their only purpose is to let
your mail recipients know who you are and the address to which their replies
should be sent. You could enter any address in the "E-mail Address" field and
it will allow you to send the email; however, if you do not own that address,
then you won't see the replies, of course!
SPF
If you wish to use an outgoing email address that you own, but which is not
hosted by Yellocello, you are free to send it through Yellocello's servers
whilst you remain a Yellocello customer. As an increasing number of
mail servers are implementing an anti-spam feature known as Sender
Policy Framework (SPF), it is advisable to add an SPF (TXT) record to the
DNS record of the domain whose email you show as your sending address. This sounds quite technical, but is very easy to do, so just ask whoever hosts your sending email address domain.
If all your domains are hosted by Yellocello, then you need not worry about this.
Control Panel
You can access your control panel to change your mailbox password or add an
auto-responder (out-of-office reply), etc by going to cp.yellocello.com
(or clicking the link from www.yellocello.com)
and entering your username and password.
Spam
If you were previously using one of the major free email providers (eg Hotmail,
Gmail, AOL, etc.), you may well initially notice a lot more spam once you start
using your new mailbox. This is because those free email providers run very
aggressive spam filters that delete a lot of spam before it reaches you. Usually,
you cannot control those filters (beyond setting up so-called 'white lists'
of allowed senders) and so they will not take into account your personal email
needs. Whilst they do a great job of deleting the obvious spam, they may well
also delete legitimate mail being sent to you or miss out a lot of other spam
that still gets through to you.
At Yellocello, we allow you take full control of your spam filtering, using
an industry standard software package, called SpamAssassin. Initially, the filtering
will be switched off, but all you need to do is log into your control panel
and click on the "Spam Filter" icon for your mailbox. When you switch it on,
it can be set to mark items identified as spam by adding the text "****SPAM****"
to the subject line of incoming mail. You can set a rule in your mail program
(eg Outlook or Apple Mail) to move such mail to a folder for deletion or review.
Alternatively, if you prefer, you can change the spam filter setting in the
control panel to delete all items identified as spam as soon as they hit the
server, so you never see them.
The filter is very sophisticated and you can set the sensitivity that determines
the number of 'clues' (spam-like indicators) within an incoming email to indicate
its chances of being spam. The default score setting is '7', meaning that the
SpamAssassin software will treat an item as spam if it spots 7 different things
within one email to suggest its likelihood of being spam. If you reduce that
number (eg to '4'), then only 4 spam-like indicators within an email will lead
to that email being treated as spam. Thus a smaller number in the score setting
will pick up more spam. However, if you reduce that number too far, then more
of your legitimate mail will also be treated as spam, as individual words used
in your friends' or colleagues' incoming mail may be considered enough to treat
the message as spam.
In order for the software to best reflect the type of mail that you receive,
the software runs extremely complex algorithms (calculations) that you can 'train'
to understand your email habits. To train your copy of SpamAssassin, go to the
'Training' tab of the Spam Filter section in the control panel and mark individual
incoming messages as spam or not spam. Full details of how to do this are provided
by clicking the 'Help' link in the menu bar running down the left of the control
panel window. The more messages that you have 'trained', the better the filter
will be at detecting your spam. Once you're happy that it is detecting most
of your spam and not treating legitimate mail as spam, you may then wish to
change the main setting to delete spam, rather than merely marking it as 'spam'.
You can do this in the tick-box on the 'Preferences' tab of the Spam Filter
section in the control panel.